
SAP Analytics Cloud (SAC) allows for data acquisition from various on-premise solutions, including BI4.x universes, SAP BW, OData, SAP ERP, SAP BPC MS, JDBC sources, and SAP BPC NW. This blog will cover how to setup HANA Cloud Connector and SAP Analytics Cloud Agent to allow SAP Analytics Cloud to acquire data from these sources. Typically this setup would be done by someone in IT. After the HANA Cloud Connector and SAP Analytics Cloud Agent have been setup inside your organization, your business users can access on-premise data. To allow for this you will need to complete the following tasks:
- Install and initial configuration of SAP HANA Cloud Connector
- Deploy SAP Analytics Cloud Agent
- Optionally deploy SAP JCO connectors for BW and ERP connectivity
- Configure Access Control in SAP HANA Cloud Connector
- Configure SAP Analytics Cloud Agent in your SAC tenant
Note: SAP BPC NW and on-prem ODATA services do not require deployment of SAP Analytics Cloud Agent. For SAP BPC NW and ODATA connectivity from SAP Analytics Cloud follow the sections on Install and initial configuration of SAP HANA Cloud Connector and Configure Access Control for BPC and ODATA section under Configure Access Control in SAP HANA Cloud Connector.
Install and initial configuration of SAP HANA Cloud Connector
In order to configure SAP HANA Cloud Connector (HCC), the SCP account name and S-User credentials are required for the SCP instance where your SAC tenant is running. To obtain this information, the SAP Analytics Cloud system owner must open a SAP Product Support Incident using the following link:
https://launchpad.support.sap.com/#incident/solution
Use the component LOD-ANA-BI to log your support ticket. In the support ticket, indicate that you want to set up data acquisition with the cloud connector and include your SAP Analytics Cloud tenant URL along with your S-User account ID.
Note: For security reasons the support ticket has to come from the tenant owner. The S-user account to be granted access can be another tenant admin.
The support team will respond with details like your Account Name and LandScape Host, which along with your S-User account will be required for Hana Cloud Connector Configuration later.
https://help.hana.ondemand.com/help/frameset.htm?e23f776e4d594fdbaeeb1196d47bbcc0.html
Install HANA Cloud Connector
NOTE: HANA Cloud Connector needs to be installed on a machine on the same network where your on-premise systems like BW, BI4 etc. reside. The HANA Cloud Connector also needs to be able to communicate with the datacenter where your SAP Analytics Cloud tenant resides. A detail list of pre-requisites is available at the link below:
Access https://tools.hana.ondemand.com/#cloud and download SAP JVM 8. I used JVM 8 on my system but you can also leverage your existing JVM 7, or JVM 8 installation. Check the pre-requisites on the link above for supported version of JVM.

Extract the zip file on the server where HCC will be installed. I extracted mine under C:SAPJVMsapjvm_8
Download the latest version of HANA Cloud Connector installation appropriate for your OS distribution. My install is on a Windows server hence the Windows MSI download.

Double click on the downloaded MSI file to launch the installation of HANA Cloud Connector and select an install folder.

Specify the JDK directory and complete the installation process. Choose the option to start the HANA Cloud Connector after installation.


Initial Configuration of HANA Cloud Connector
Launch https://:8443 to launch the HANA Cloud Connector configuration page.
https://localhost:8443 can be used if accessing from the same machine where HCC is installed.
Ignore the certificate warning and continue to the site
Login with the default credentials of:
User: Administrator //User is case sensitive
Password: manage
The default password will have to be changed after first login.

Once logged in, choose the option to Define SubAccount.
Specify the following information(retrieved earlier through the support ticket).
Landscape Host:
Account Name:
User:
Password:
If you access the internet through a proxy, specify your proxy host and port number otherwise you can leave those blank.
Save your configuration.


Confirm that the connector state shows as Connected. You may have to hit the Connect button on the right of the screen.

Install Tomcat and deploy SAP Analytics Cloud Agent
Install Tomcat
Download Tomcat 8 for Windows from https://tomcat.apache.org/download-80.cgi

Double click the downoaded Tomcat executable to launch the installation and accept the license agreement.
On the Choose Components screen, leave the default options

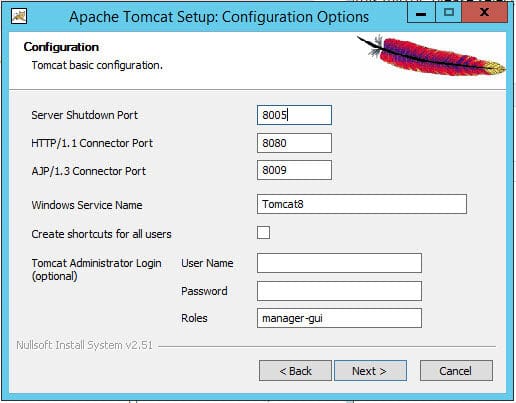
Specify the Tomcat ports to use. Ensure there are no port conflicts with existing applications that may be running on your system already.
Specify the path to your JVM folder.
Note: You must use 64 bit JVM. In this case, we are using the same 64 bit SAP JVM that we use for HANA Cloud Connector configuration earlier.

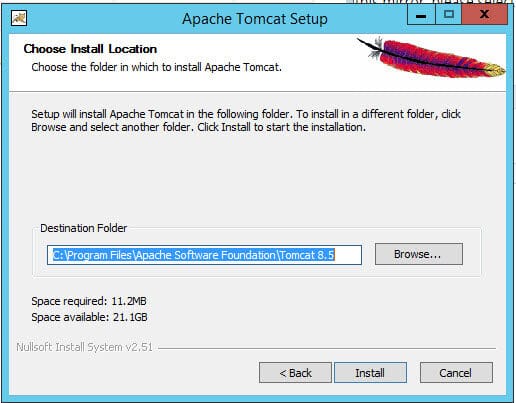
Choose an Installation folder and click Install.
Click Finish to complete the install.
Launch Tomcat configuration to and update the JAVA Heap space allocation. To launch, navigate to Tomcat installation directory and double click Tomcat8w.exe.

The default value for -Xms and -Xmx is usually 128MB, and 256MB respectively and is usually not sufficient. Failure to increase these values will usually result in timeout errors when acquiring larger data sets into SAC. Here I’ve set the values to 1024MB and 2048MB, but you may have to increase the Maximum Memory pool(Xmx) to even higher value in your landscape.

Deploy SAP Analytics Cloud Agent
Note: This step is not necessary if only connecting to SAP BPC NW from SAP Analytics Cloud. Proceed to Configure Access Control in SAP HANA Cloud Connector section below and follow the steps specific to creating access control for SAP BPC NW.
The SAP Analytics Cloud Agent(SAAC Agent) is just a war file that can be deployed on Tomcat application server. This can either be an existing Tomcat Java application server running in your environment or install(like I have done) a separate application server to deploy SAC Agent war file. My recommendation would be setup a new Tomcat server to deploy the SAC Agent. The main reason for this recommendation is that SAC Agent is being updated frequently to take advantage of the new connectivity types being offered in SAP Analytics Cloud. As SAP Analytics Cloud is being updated frequently, the SAC agent must also be updated to keep pace with this innovation. This means you may have to deploy a new SAC Agent war file every few weeks, which could result in taking a potential down time on running application server that may be hosting other apps. To avoid impacting an existing production application server and potentially take a down time to deploy new war file, it’s advisable to setup a separate application server for SAC Agent deployment.
To download SAC Agent access https://support.sap.com/swdc
Click Access Downloads.

Search for “Analytics Cloud Agent” and click on the latest version available to download the file.

Extract the zip file and copy the C4A_AGENT.war file into tomcat webapps directory. The war file will automatically deploy once Tomcat is restarted later.

Modify the tomcat-users.xml file under the tomcat conf directory using Notepad and add a new user with Services role. The username/password used here will be required later when configuring the SAC Agent in SAP Analytics Cloud. Type the following lines into the xml file and modify the username/password for your environment.
NOTE: Do not copy and paste the lines above in the tomcat-users.xml file as I’ve heard the double quotes don’t copy over properly.


Save the tomcat-users.xml file. You will need to restart your Tomcat application server for the settings to take effect. If you also plan on deploying the SAP JAVA Connectors, hold off on restarting the server until those files also deployed (see below).
Optionally deploy SAP JCO connectors for BW and ERP connectivity
Deployment of SAP Java Connectors is only required if you plan on using SAP BusinessObjects Cloud to acquire data from an on-premise BW or ERP systems.
Access https://support.sap.com/swdc
Click on Software Downloads
Search for “java connector” and download the latest versions of 64 bit SAP JAVA Connector for the appropriate operating system.


Extract the downloaded zip file and copy sapjco3.dll and sapjco3.jar file into tomcat/lib directory

Restart Tomcat application server.
Configure Access Control in SAP HANA Cloud Connector
Launch https://:8443 to launch the HANA Cloud Connector configuration page.
https://localhost:8443 can be used if accessing from the same machine where HCC is installed.
Login with your credentials and select Cloud To On-Premise. Click the + icon to add a new Access Control.

Choose Other SAP System as the Back-end Type

Select HTTP protocol. Choose HTTPS if SSL configured on the Tomcat instance where the BOC Agent is deployed.

Enter the hostname (Internal Host) and portnumber (Internal Port) of the tomcat server where the SAC Agent is running.
The default tomcat http port is 8080 and the https port is 8443.

Optionally enter the Virtual hostname and port to use on the cloud side. The defaults are the actual hostname and port specified in the previous step, but this can be changed so that the actual hostname and port is not visible in SAP Analytics Cloud. The virtual hostname and port could be any name or port of your liking. The virtual hostname and port will be used later when configuring the SAC Cloud agent in SAP Analytics Cloud.

Choose None for the Principal Type. The option to use Kerberos is a topic for later blogs.

Optionally add a description on the next screen and click Next.
Select the option “Check availability of internal host” to ensure the HANA Cloud Connector can access the C4A Agent.
Click Finish.

The HCC configuration screen should look similar to the one below.
Under Resources Accessible on click + to add a new resource.

Set the URL PATH: /C4A_AGENT/ and choose the option Path and all sub-paths and click Save

Your HANA Cloud Connector screen should look like the screen below. Your mapped system should be in green status.

Configure Access Control for BPC and ODATA
For BPC:
- Virtual and Internal host =
- Virtual and Internal port =
- URL path = /sap/bpc
- Access policy = Path and all sub-paths
For ODATA:
Add a new system mapping and resource with the following details:
- Virtual and Internal host =
- Virtual and Internal port =
- URL path = /
- Access policy = Path and all sub-paths
:Configure SAP Analytics Cloud Agent in your SAC tenant
Launch your SAC system (tenant) URL and log in with an account that has administrative access.
Access System >> Administration option

Click on the DataSource Configuration tab and click the edit button on the top right corner of the screen. Enter the following information:
Host:
Port:
Username:
Password:

Click the Check Configuration button to validate the configuration.
Save your configuration. You are now ready to acquire data from on-premise BI4 universe, BW, ERP, JDBC, ODATA and BPC data sources.
Still having troubles setting this up? Have a look at this handy troubleshooting guide created by one of my colleague:
Troubleshooting guide: SAP BusinessObjects Cloud Agent
To acquire data from a universe, have a look at Matt Pott’s blog:
Using BI Platform Universes in Cloud for Analytics
For accessing on-premise system from SAP Analytics Cloud in online (i.e. no acquisition) mode, follow Dong Pan’s blog post:
How to Setup Connection to a Remote HANA System
New NetWeaver Information at SAP.com
Very Helpfull