
1. Overview
SAP delivered standard ESS applications come with FPM road maps where users get the option of editing the infotypes. New and delete options are controlled from the back end portal config. Very frequently we would be getting requests for displaying some or the other infotypes like Personal Data (IT0002), Bank Details (IT0009), Address (IT0006), Personal Ids (IT0185) etc in read only mode. Business doest want to give the edit options to the end users.
There are different ways to achieve this. I was thinking about what would be the better way and still achieve good presentation. Thought lets try it by using FPM Application and FPM Views. In this way without modifying the SAP code we can achieve the requirements.
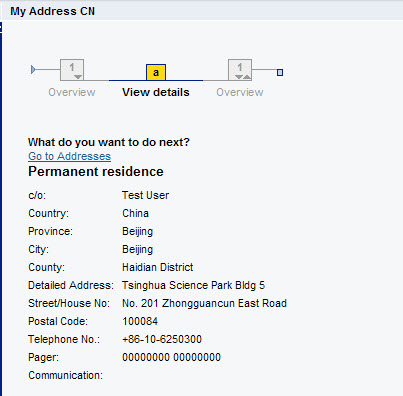
For proof of concept/demo I have selected the SAP delivered standard China Address (IT0006) ess~cn~addr~sap.com application for making it as read only application. Here is the output of it.

2. Create New Web Dynpro Application
From NWDS create a new Web Dynpro application. We need only the WD Application. We would be reusing the existing components by using the FPM framework. So we need not create the components. When we create the DC, we need to add the Used DCs pcui_gp/xssfpm. I think it should be sufficient. I have also added ess/per and pcui_gp/xssutils.
While creating, select the existing Web Dynpro Component:
Web Dynpro Component: FPMComponent
Interface View: FPMComponentWindowInterfaceView
Startup Plug: Default

Note: We are creating new Web Dynpro Application as we don’t want to change/disturb the existing FPM Application settings.
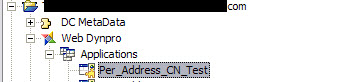
3. Copy application properties.
Copy the standard Web Dynpro DC application properties to the newly created application.
In this example I am showing how to make the China address application to read only. We need to copy the CN address application properties to this newly created WD Application.
We would be modifying the sap.xss.BaseConfigurationID to point to the new FPM application
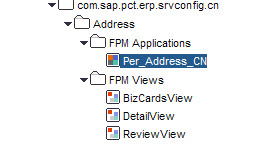
4. Creating new FPM Application
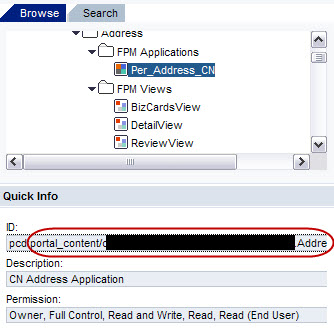
Create a new FPM Application from the Self-Service Administrator role. Or we can copy the standard CN Address FPM Application into our folder and then we can customize it as per our needs.
5. Define road map, perspective and events for the FPM Application
a). Define Roadmap Step:
- Overview:
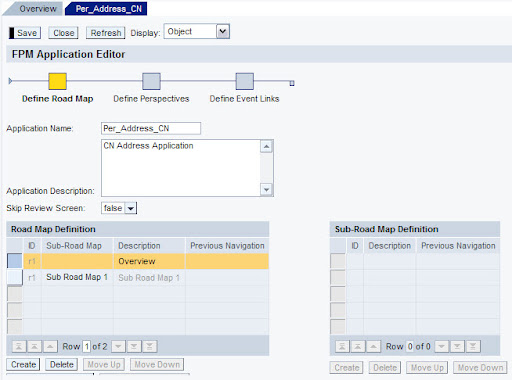
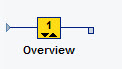
I am creating one step road map with Overview and sub road map in it.
- Sub Roadmap:

Sub road map with view details text will be displayed like this.

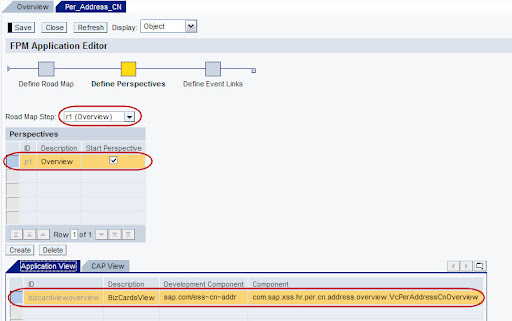
b). Define Prespectives Step:
- Overview screen:
BizCardsView is displayed here. Right click on the BizCardView (FPM View) and add it to this FPM Application.
- View details screen:
We are showing confirmations links and the review view.
Right click on the ConfirmationNaviView (FPM View) under the PER folder and add it to the FPM Application. Similarly add the ReviewView.

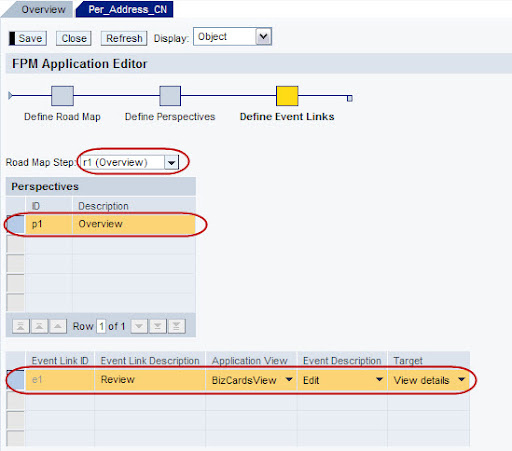
c). Define Event Links:
- Events from Overview screen:
From the overview screen we would be navigating to the Review view. We would be using the edit event for the navigation. (Edit button text would be renamed to the View by using content personalization)
- Events from view details screen:
I have left it blank as we can use the confirmation link to navigate back to the Overview screen.

6. Updating the sap.xss.BaseConfigurationID
Copy the PCD location of the newly created/copied FPM Application.
Update the sap.xss.BaseConfigurationID with this new value. This has to be done in NWDS in the Web Dynpro Application properties.
Copied value has to be updated in WD Application Properties for the sap.xss.BaseConfigurationID
7. Create the iView
Build and deploy your changes. Create the Web Dynpro iView for the newly created application from the Content Admin role.
8. Make the personalization changes
Build and deploy your changes. Create the Web Dynpro iView for the newly created application. We need to rename the Edit button text to View as we are going to use the Edit event for navigating to the next screen.
From Content Admin, open the iView. Do the preview of iView and then use Ctrl + Right mouse click on the Edit button to display the web Dynpro personalization. Make the required changes.

After personalization iView will get displayed like this.
9. What happens when ESS/MSS applications get converted to ABAP based Web Dynpro.
The current solution which we discussed is for Java based Web Dynpro ESS applications.
As we all know, the ESS and MSS applications are getting converted into ABAP based Web Dynpro applications using the FPM frame work in ABAP. I believe in future releases all the ESS and MSS applications would be in Web Dynpro for ABAP (WDA).
How about then, what would be our approach. Once the applications get converted into WDA, the ESS and MSS applications would still be using the FPM framework of ABAP. The user interface/look and feel will not be changing, it would still be having the same/similar kind of screens and navigation i.e. applications would still have the Overview, Edit, Review and Confirmation screens and they would be using the FPM frame works and we would be still seeing the roadmaps etc.
As Web Dynpro for ABAP allows us to create new Web Dynpro applications and allows us create/change the configurations, we can still go ahead with same approach/concept i.e. creating new application and create the new configuration suiting our requirements. We can define the roadmaps/sub roadmaps and attach the existing views as we did in Web Dynpro for Java using the Self Service Administrator role.
10. Conclusion
We need to go for this solution when we have to display all the subtypes of that infotype in read only mode. In case if team needs few subtypes editable and few in read-only then I believe we need to go for custom development.
New NetWeaver Information at SAP.com
Very Helpfull