
SAP PI SFTP Adapter Authentication
Overview
- In SAP PI, we can access SFTP server of client using SFTP Adapter.
- SAP-PI can use SFTP Adapter in below two manners:
- SFTP Sender Adapter: To pull files from SFTP server’s folder
- SFTP Receiver Adapter: To push files to SFTP server’s folder
- In this blog we conclude below aspects:
- Authentication technique for SFTP Server
- SFTP Sender Communication Channel Configuration
- SFTP Receiver Communication Channel Configuration
Authentication technique for SFTP Server
To access SFTP server from SAP-PI using SFTP adapter, below details are required:
- SFTP Server IP
- SFTP Server Port (default port is 22)
- SFTP Server Fingerprint
- If SFTP Server Fingerprint details are not available then we can ignore it by providing input as * (star) in SFTP Communication channel
- SFTP Server Fingerprint can be generated using tool any standard tool like ‘FileZilla’, where we need to provide SFTP server details, while conencting tool will show SFTP’s fingerprint

- SFTP Fingerprint looks like as below:
![]()
- Authentication Method supported by SFTP server: It can be either
- ‘user-id/Password’ based authentication
- Here SFTP server is accessible via its user-id/password
- ‘Private Key’ (Certificate) based authentication
- In certificate based authentication, SSH clients and servers authenticate each other via public/private key pairs. Each must have access to their own private key, and other’s public key
- ‘user-id/Password’ based authentication


SFTP server authentication using ‘Private Key’ method
- When SFTP server supports key based authentication, we need to maintain below details in SAP-PI:
- SAP-PI’s Private Key View
- SAP-PI’s Private Key Entry
- SFTP Server’s username
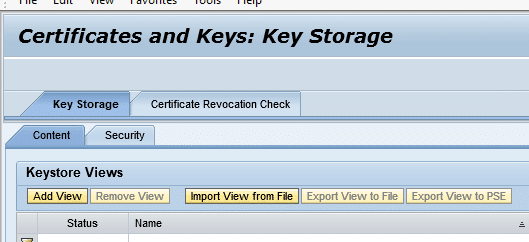
- In SAP-PI, Private/Public SSH Key can be maintained using following steps:
- Go to SAP-PI’s nwa url
- https://:/nwa
- Create a new Keystore view,
- Go to nwa url page -> Configuration Management -> Security -> Certificates and Keys -> Key Storage -> Content -> Keystore Views
![]()
- To create a new keystore view, click on button ‘Add view’

- Create a Keystore Entry in same keystore view which just created above
- Provide details as Entry Name, Algorithm as RSA and Key length 1024 or 2048, validity time
![]()
- Entry Type ‘Private Key’
- Follow the rest step to complete creation of Keystore Entry
- Export Keystore view and Keystore Entry
- Select row of Keystore view and its respective Keystore Entry

- Click on button ‘Export Entry’ -> export format ‘PKCS#12 Key Pair’ -> enter a password here and note it down
![]()
- Click on link ‘Download’ to extract .p12 file for example file name is ‘PItoSFTP_Key.p12‘.
- Now using tool ‘OpenSSL’ (in any windows local desktop) perform below activities:
- Extract ‘OpenSSL’ in to a directory for e.g. ‘C:/OpenSSL/’
- Copy ‘PItoSFTP_Key.p12‘ into ‘C:/OpenSSL/bin/’
- Create .PEM key file from .p12 file using below command in cmd prompt
- cd OpenSSLin
- openssl pkcs12 -in PItoSFTP_Key.p12 -out PItoSFTP_Key.pem
- Enter Import Password: pass1234
- Enter PEM pass phrase: pass1234
![]()
- Create SSH Private Key from PEM key
- openssl rsa -in PItoSFTP_Key.pem -out PItoSFTP_Key.key
- Enter pass phrase for PItoSFTP_Key.pem: pass1234

- Now upload Private SSH key file ‘PItoSFTP_Key.key’ in to SAP-PI server
- Generate SSH Public Key:
- Using SSH Key Generator in PI-server, we can generate SSH public key from private key file, with below commands:
- su
- chmod 600 PItoSFTP_Key.key
- ssh-keygen -y -f PItoSFTP_Key.key > PItoSFTP_Key.pub
- SAP-PI’s SSH Public Key ‘PItoSFTP_Key.pub‘ has been generated, which need to be imported in SFTP server for authentication.
- Using SSH Key Generator in PI-server, we can generate SSH public key from private key file, with below commands:
- Note:
- Here only SAP-PI’s SSH Public is been shared and imported into SFTP server
- SAP-PI using Receiver SFTP communication channel will be able to send files into SFTP server folders.


SFTP Receiver Communication Channel Configuration
- To send files to SFTP server folder, we use SFTP Receiver Communication channel
- Provide respective details in input fields of channel as shown in below screen
![]()
- In SFTP server folder, files will be dropped with same original name by enabling Adapter Specific Message-Attributes and using %FileName% in FileName input field
![]()


SFTP Sender Communication Channel Configuration
- When requirement is to get/read files from SFTP server folder, we use Sender SFTP Adapter.
- In Sender Channel, provide input for SFTP server’s IP/Port/Fingerprint/Authentication details as shown in below screen:
![]()
- Directory references starts from root directory of SFTP server
- And we are reading all files of that direcrtoy using Filename input .*
- To archive read files, we can use below parameters:
- Given ‘Archive name’ will move same read file to mentioned Archive path with prefix ‘ARC_’ in original filename


New NetWeaver Information at SAP.com
Very Helpfull