
NOTE: Please refer below blog for most uptodate information in this topic:
https://blogs.sap.com/2017/02/15/sap-s4hana-system-conversion-custom-code-adaptation-process/
When you use the transition scenario conversion to S/4HANA 1610, in the Prepare phase you follow the steps for Custom Code Migration Worklist. This blog describes the procedure and in addition if you don’t have a NW7.5 system, the steps needed to create one using Cloud Appliance Library.
Please refer other blogs as follows:
| TOPIC release-> | 1709 | 1610 | 1610 | 1610 | 1511 | 1511 |
| stack-> | FPS0 | FPS2 | FPS1 | FPS0 | FPS2 | FPS1 |
| NEW INSTALLATION: | ||||||
| Part 1 – Maintenance Planner | link | link | link | |||
| Part 2 – Installation | link | link | link | |||
| Part 3 – Best Practices Content Activation – USA | link | link | link | link | link | link |
| Part 3A – Best Practices Content Activation – Germany | link | link | link | link | ||
| SYSTEM CONVERSION: | ||||||
| Part 1 – Maintenance Planner | link | |||||
| Part 2 – Pre-checks | link | |||||
| Part 3 – Custom Code Migration WorkList | link |
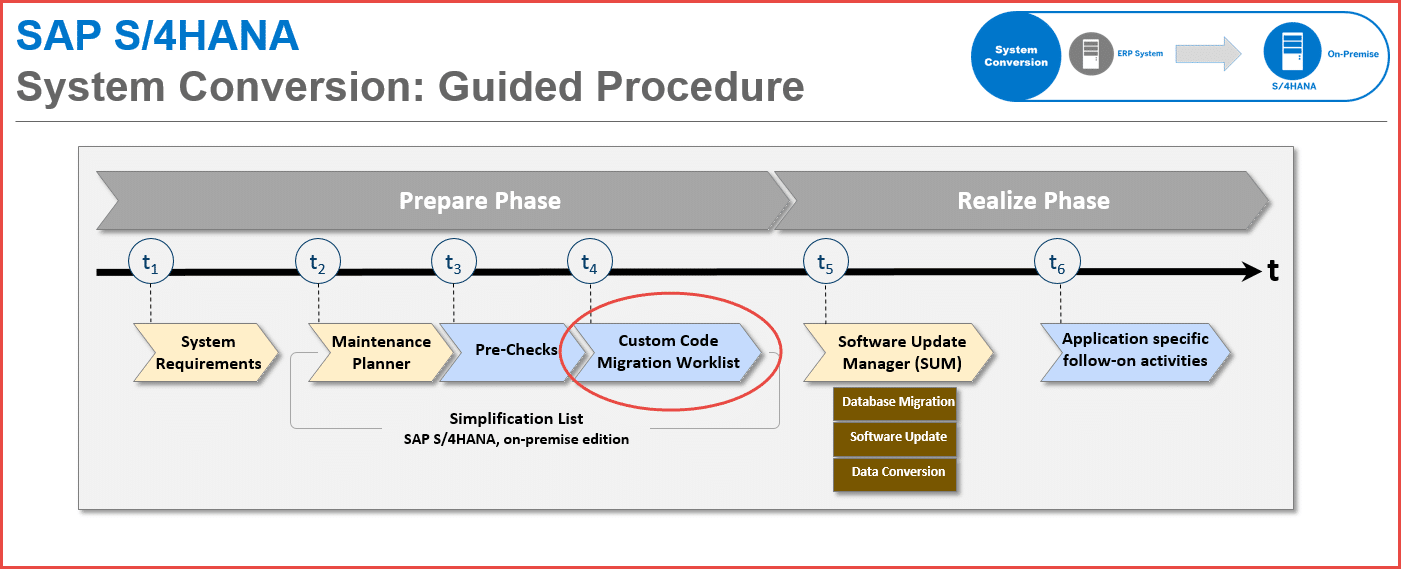 In short, for this procedure, the simplifications are loaded into the Custom Code Migration tool. After you run the tool, you get a list of instances where your custom code does not comply with the scope and data structure of SAP S/4HANA.
The solution is based on Custom Code Analyzer and Update for analysis tools in 7.5, complete process is summarized as follows in four Sections A, B, C, D:
SECTION A: Steps to do in old ERP System to be Converted
SECTION B: Steps to download Custom Code Check Content
SECTION C: Steps to do in NW 7.5 system to prepare Custom Code Analysis Result
SECTION D: Steps to do in NW 7.51 system for Code Inspector analysis

SECTION A: Steps to do in ERP System to be Converted
STEP A1: In ERP System update Where-used index
Login to the ERP system and run program SAPRSEUB in background to update where-used index. This job may take upto 24 hours.
TIP: This job may take 48 hours or more. You may kick off this job immediately. While the job is running you can apply notes below and do other preparations.

STEP A2: In ERP System apply Notes 2185390 – Custom Code Analyzer

You will be prompted to load notes as below

(list may change) and these notes require further notes.
After all dependent notes are downloaded, you may get screen below

For the Manual steps above please follow the procedures. Create transport as necessary when prompted.
TIP: Please note in the above SYCM_ANALYSIS ia a subpackage of SYCM_MAIN.
This prepares the ERP system for downloading the repository info.
STEP A3: Download Repository Info from ERP system
Logon to ERP system and run tCode SE38 ABAP Program SYCM_DOWNLOAD_REPOSITORY_INFO. Create Variant as below and check Multiple value entries as below:

TIP: Please chck that the Customer Namespace includes the required items only as shown below, otherwise job may run for longer than needed if SAP standard objects are included.
Edit and Save the variant
 Execute Program in Background. Include the Variant name as below
You should get a message that program is started in background

Check Status of Job and wait till it is completed successfully. Enter tCode SM37 and check job status
===================================================================TIP START
TIP: Error running report SYCM_DOWNLOAD_REPOSITORY_INFO with ABAP DUMP READ_REPORT_LINE_TOO_LONG

ISSUE RESOLUTION: Locate the ABAP program that is causing the issue – LZEHPRC_CP_BB20UXX

Enter tCode SE38, Program LZEHPRC_CP_BB20UXX, click on Change (You will need developer access). Go to menu option Utilities, Settings

select option above, click on OK. Save and Activate the program. Rerun the job from the beginning.
=====================================================================TIP END
When the job is completed you will get message below. In case you get a dump, please follow instructions in troubleshooting section at end to correct the error and run program again.
Download the Repository Info Zip file. Again execute SE38 program SYCM_DOWNLOAD_REPOSITORY_INFO and click the icon to download the file
Alternatively you can download file from OS level from /tmp/S4HMigrationRepositoryInfoERP.ZIP
SECTION B: Steps to download Custom Code Check Content
Go to Service Marketplace https://support.sap.com/swdc Software Downloads -> INSTALLATIONS AND UPGRADES – C -> CCMSIDB and download latest version of simplification database file CCMSIDB00P_5-80001018.ZIP

SECTION C: Steps in NW 7.5 system for Custom Code Analysis Result
For this step you require the Repository Information file downloaded as shown in section A. A Netweaver 7.5 instance can be created in different ways:
- If you already have a NW7.5 system (doesn’t matter if that system is used for other apps or is part of S/4HANA 1511), skip step C1.
- You can create from Cloud Appliance Library and you can follow steps in this section. If not you can use the Cloud Appliance Library shown to create your own CAL instance.
- You can create a S/4HANA appliance in CAL or install on premise version of CAL and this is higher cost but gives you other benefits of having sandbox system.
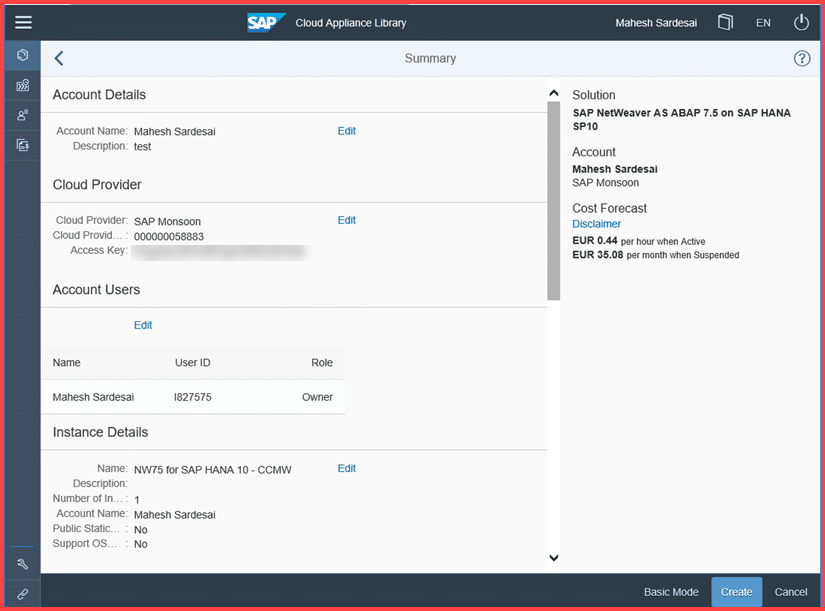
STEP C1: GoTo either SAP Monsoon, Amazon Web Services or Microsoft Azure and locate instance below and create your own instance.
In browser, enter URL for Cloud Appliance Library https://tiint.hana.ondemand.com/console/#/solutions , enter filter as “netweaver as abap 7.5 on SAP”.
TIP: The Sybase ASE instance is less than half the cost and can be used but you may spend much more time and may run into memory errors that will need parameter change at database level. Below screen are shown for SAP Monsoon but you can use Amazon Web Services or Microsoft Azure. Before you create instance please decide whether it should be created on SAP internal Network or External Public Network.
TIP: If you choose to create it on SAP internal network the connection is provided but for External instance on Internet VPC you will have to find out message server details to connect SAPOSS RFC connection through your saprouter.
Click on Create Instance.H ere is the summary screen for creating SAP Monsoon CAL.

TIP: The below private key will not be required unless there is issue with system and alternative to this is to recreate a new instance.

Wait for instance to be activated – about 40 mins. You can download the guide to get familiar with the instance and know the master passwords, etc.
 In case you have to connect to CAL again the filter is NW75 for SAP HANA10 – CCMW. Click on
  Connect
The Login details you need are below. Login to client 001 and copy DDIC to create user BPINST
| Name | Value | Description |
| SID/Instance No | A4H/00 | System ID of the SAP system /Instance No |
| Client | 001 | |
| Username | DDIC | Create ID BPINST as copy of DDIC when you login |
| Password | Password used when creating CAL |
STEP C2: Import the Simplification DB in NW7.5 ABAP System
The Netweaver system has to be connected to OSS for SNOTE download as it will automatically download the notes. This is already setup for the Intenal CAL created in Monsoon, but others may require setup.
Enter tCode SE38, program SYCM_UPLOAD_SIMPLIFIC_INFO. In the file selection dialog box, choose the ZIP file like CCMSIDB00P_4-80001018.ZIP from your drive. To start the import, choose Open.
In case you get message below, apply correction note 2228777 – Repository Information System: Custom Code Metadata Uploader and Simplification Database Content Uploader

There will be about 160 notes downloaded and checked for application. Most of these notes will not be required/obsolete.

However you may face issue if there is a message like this and need to open OSS message.
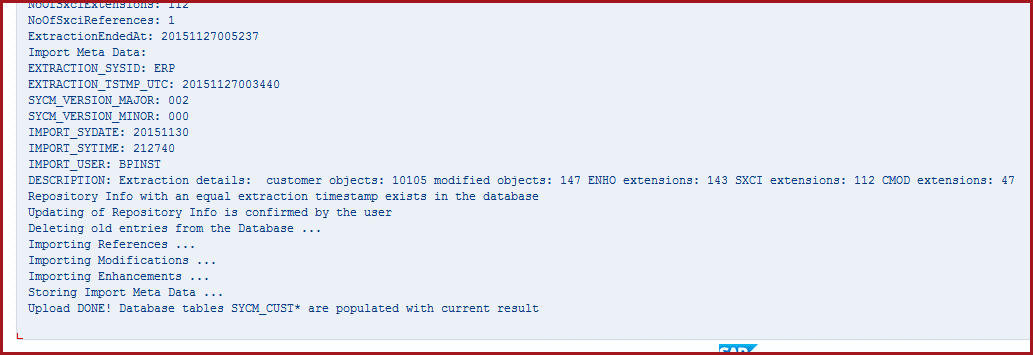
You may get a message that more Notes are to be downloaded and at the end of upload of Simplification DB you will get message below:

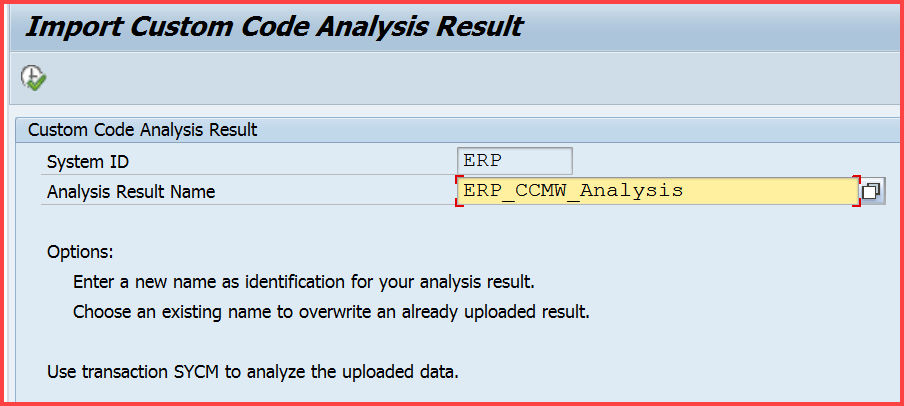
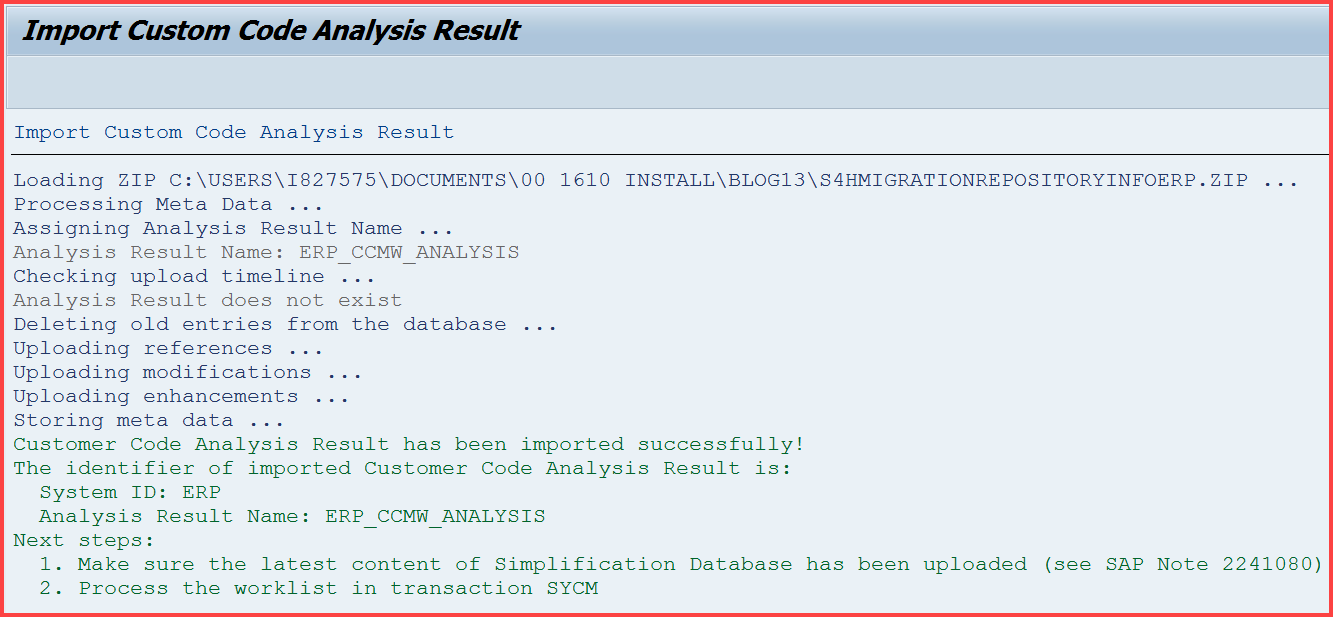
STEP C3: Upload custom code metadata into NW 7.5 ABAP system
Enter tCode SE38, program SYCM_UPLOAD_REPOSITORY_INFO.
In the File Selection dialog, choose ZIP – file typical name S4HMigrationRepositoryInfoERP.zip that contains the extraction of Repository Info and choose Open to start the import.
After successful import you will see the last part of screen as below for successful import
STEP C4: Run Analysis Report in NW 7.5 ABAP system
Enter tCode SE38 and run program SYCM_DISPLAY_SIMPLIFICATIONS
 Please find the Custom Code Analysis Report below:
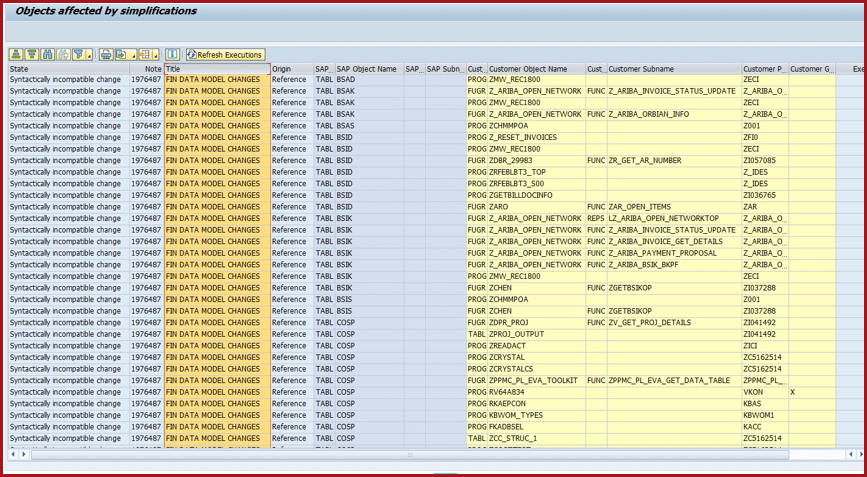
Please note the above report which you can export to Excel for easier convenience
TIP: Please do not forget to suspend or terminate instance if you no longer need it after analysis is completed.
The method shown in this section C is now deprecated and SAP recommends use of Netweaver 7.51 innovation package. When you use NW 7.51 the procedure is as below in short the screens remain same. Below steps are applicable for NW 7.51 system only shown briefly.
STEP C5 (FOR NW7.51 SYSTEM): Steps to run Analysis Report in NW 7.51 ABAP system
Import Simplification DB: Enter tCode SYCM, Menu Simplification Database -> Import from ZIP file and then select the file. You may be prompted for applying Notes and then after sometime the below message is displayed.
 Enter tCode SE38, program SYCM_UPLOAD_REPOSITORY_INFO
Select the Path to Zip file choose ZIP – file typical name S4HMigrationRepositoryInfoERP.zip that contains the extraction of Repository Info and choose Open to start the import. Click on Execute.
 Click on Execute. You should get this message after processing
 Enter tCode SE38, program SYCM_DISPLAY_SIMPLIFICATIONS
Select the analysis result from previous screen.

You will get the report with message below.

SECTION D: SAP Code Inspector analysis in Netweaver 7.51 system
These steps can be done in Netweaver 7.5 system but Netweaver 7.51 provides new checks with a higher level of detail and also a new SCI Variant S4HANA_READINESS. SAP recommendation is to use latest NW 7.51 system and so this section is shown for latest Netweaver 7.51 System installation or using standard CAL. Please skip steps not applicable.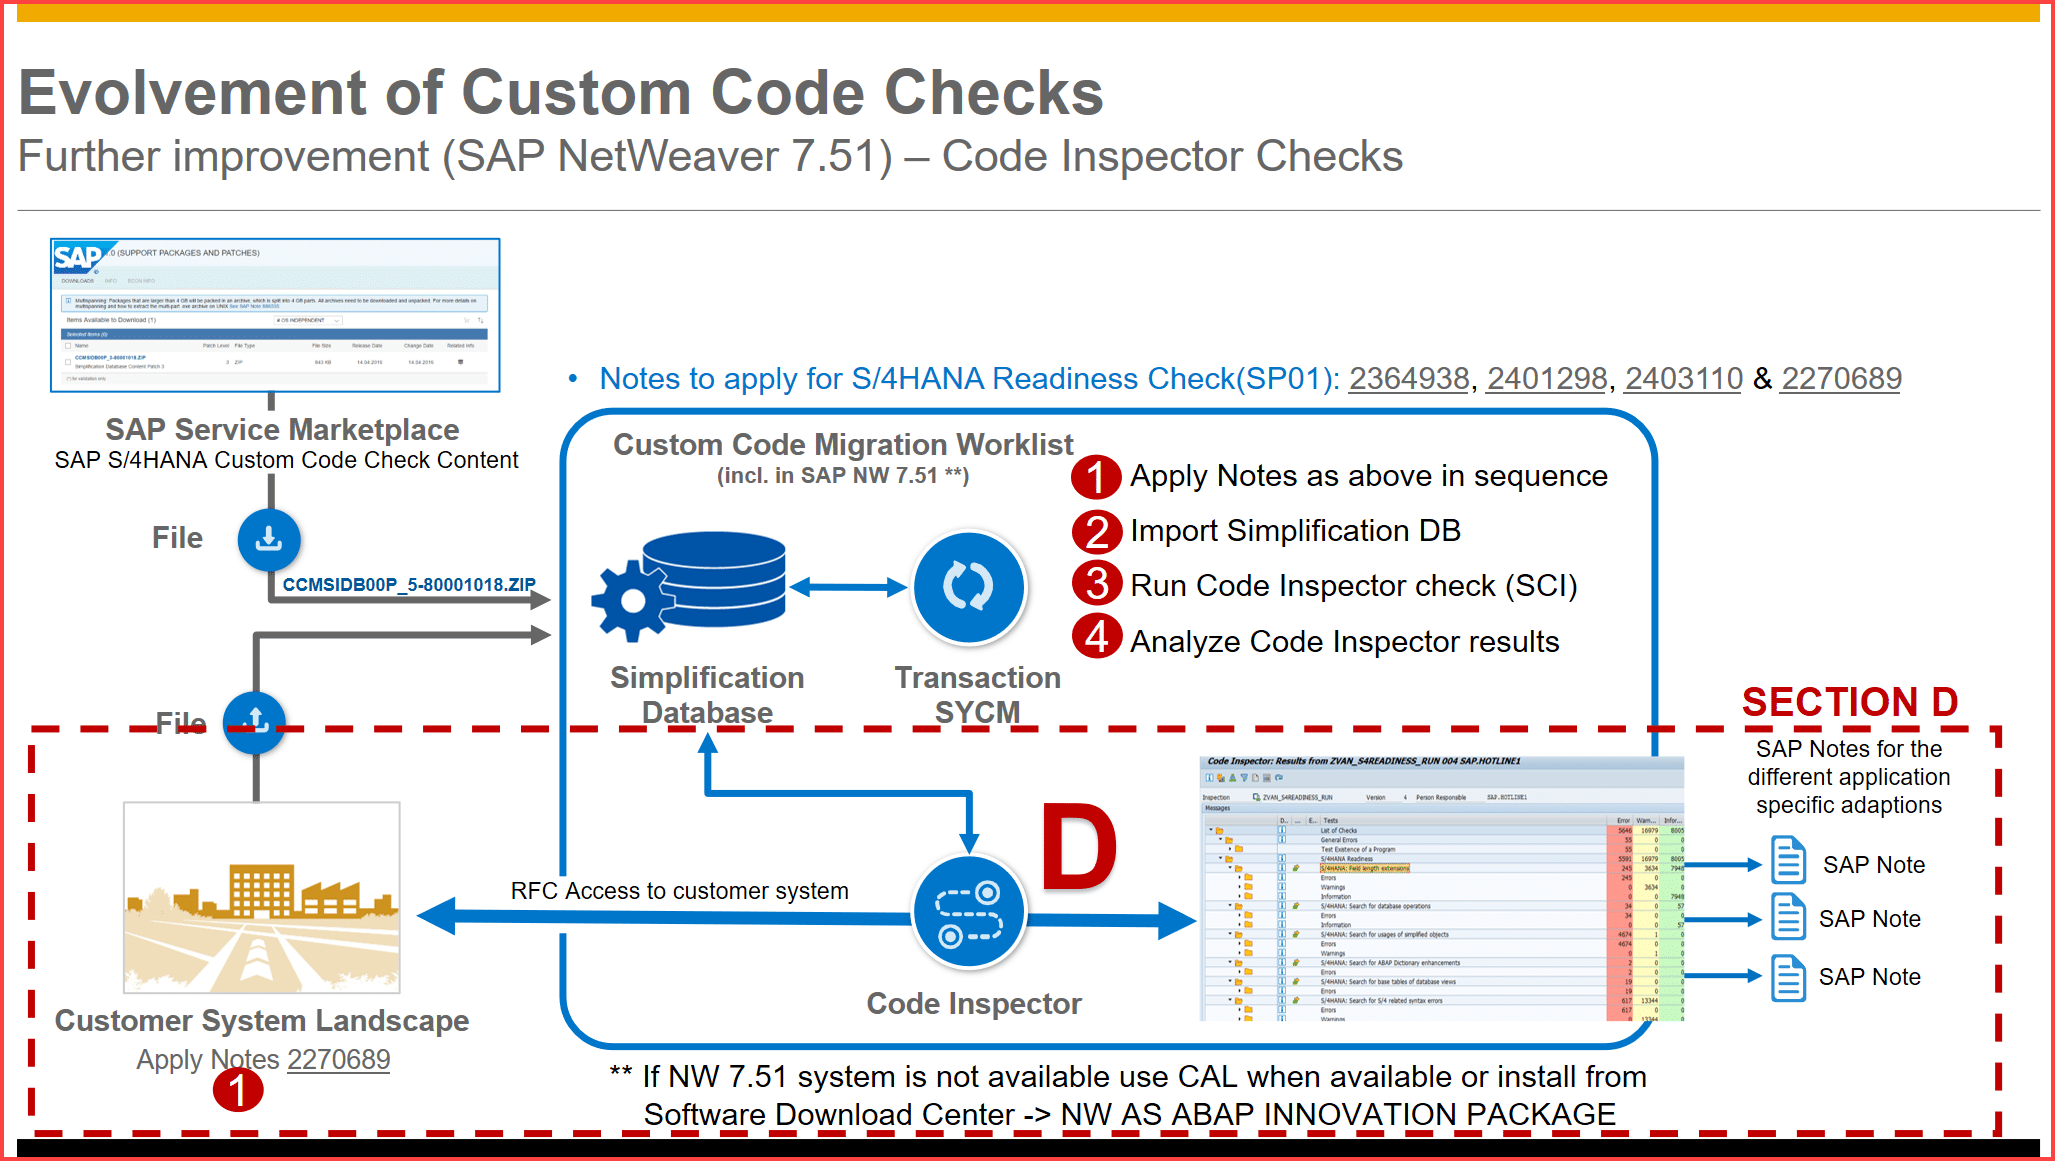
STEP D1: Apply Note in ERP System
Login to ERP system and using tCode SNOTE apply note 2270689 – RFC Extractor for performing static checks Perform manual steps for creating function group.
 TIP: For the above step you may get message that program RS_ABAP_INIT_ANALYSIS does not exist in which case please execute it as a post-implementation step after this note application creates the program.

STEP D2: Provision NETWEAVER 7.51 System
Netweaver 7.51 instance can be provisioned in different ways.
- Use existing NW7.51 system (doesn’t matter if used for other applications or even is part of S/4HANA 1610).
- Create from Cloud Appliance Library from standard CALs when available. Follow the same procedure as shown in previous section C1.
- You can create a S/4HANA 1610 appliance in CAL or install on premise version of CAL. This option is at higher cost but gives you the benefit of using as sandbox system.
- If any of above choices are not available, you can install Netweaver 7.51 system as per step D3.
- I have provided a CAL below but may be SAP internal access only as per step D4.
STEP D3: Install Netweaver 7.51 system
Go to Maintenance planner and select option to Plan a New System. Click on Plan.
 Complete the planning and produce stack.xml. Software download is available at Software Download Center -> NW AS ABAP INNOVATION PACKAGE
Install the Netweaver 7.51 system.
STEP D4: GoTo Amazon Web Services/Monsoon/Azure and locate standard instance below and create your own instance
STEP D5: GoTo Amazon Web Services and locate instance below and create your own instance
I have created NW 7.51 SP01 Solution for SAP Internal folks. In browser, goto Cloud Appliance Library enter filter as “Custom Code Migration using SCI” and choose instance below:
TIP: If you choose to create it on SAP internal network the connection is provided but for External instance on Internet VPC you will have to find out message server details to connect SAPOSS RFC connection through your saprouter.
Enter all the details and clock on Create Instance.
TIP: The above private key will not be required unless there is issue with system and alternative to this is to recreate a new instance.
Wait for instance to be activated – about 40 mins. You can download the guide to get familiar with the instance and know the master passwords, etc. In case you have to connect to CAL again specify the filter and find out the CAL under your ID and Click on Connect The Login details you need are below. Login to client 001 and user BPINST. Change password after initial login

The instance has SNOTE working and you need to done steps below from D6 onwards.
STEP D6: Apply Notes to NW7.51 ABAP System
Apply notes for S/4HANA Readiness Check in NW 7.51 system = SP01 in the order below:
Note 2364938 has status “Cannot be implemented”
Note 2401298 will download dependent Note 2362553 and has manual steps although dialog may not popup. I had to execute /nSCI -> Utilities -> Import Check Variants
Note 2403110 has no manual steps
Note 2270689 there are no manual steps (this note takes some time to download)
In case you have NW 7.51 SP00 system then the notes required are 2362362, 2362553, 2378425, 2381471 and 2270689
STEP D7: Import the Simplification DB in NW7.51 ABAP System
The Netweaver system has to be connected to OSS for SNOTE download as it will automatically download the notes. Import Simplification DB: Enter tCode SYCM, Menu Simplification Database -> Import from ZIP file and then click on select icon to choose the ZIP file like “CCMSIDB00P_5-80001018.ZIP” from your drive. You may be prompted for applying Notes and then after sometime the below message is displayed: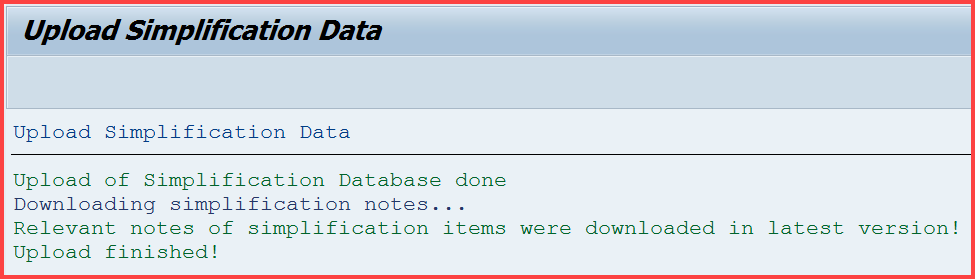
STEP D8: Setup RFC Connection to ERP System
In NW7.51 system, setup the RFC connection with remote system from NW 7.51 system.
Please provide user details in the Logon and Security tab authorization for object S_COV_ADM with value * for field ACTVT.
STEP D9: Perform the Code Inspector Check
In NW 7.51 system, enter tCode SCI
Enter name of the object set to be created (1) ZDEMO and click (2) Create button
The Code Inspector: Object Set screen is opened as shown below.
On the (1) Object Collectors tab, position the cursor in the (2) Object collector input field and choose F4. The Object Collectors dialog is opened.
Select the (3) Remote Objects (RFC) entry and confirm your selection. The Parameter dialog is opened.
In the Destination input field, enter the (5) name of the RFC destination or choose (4) F4 to search for the relevant one. Then (6) (7) Confirm your selection.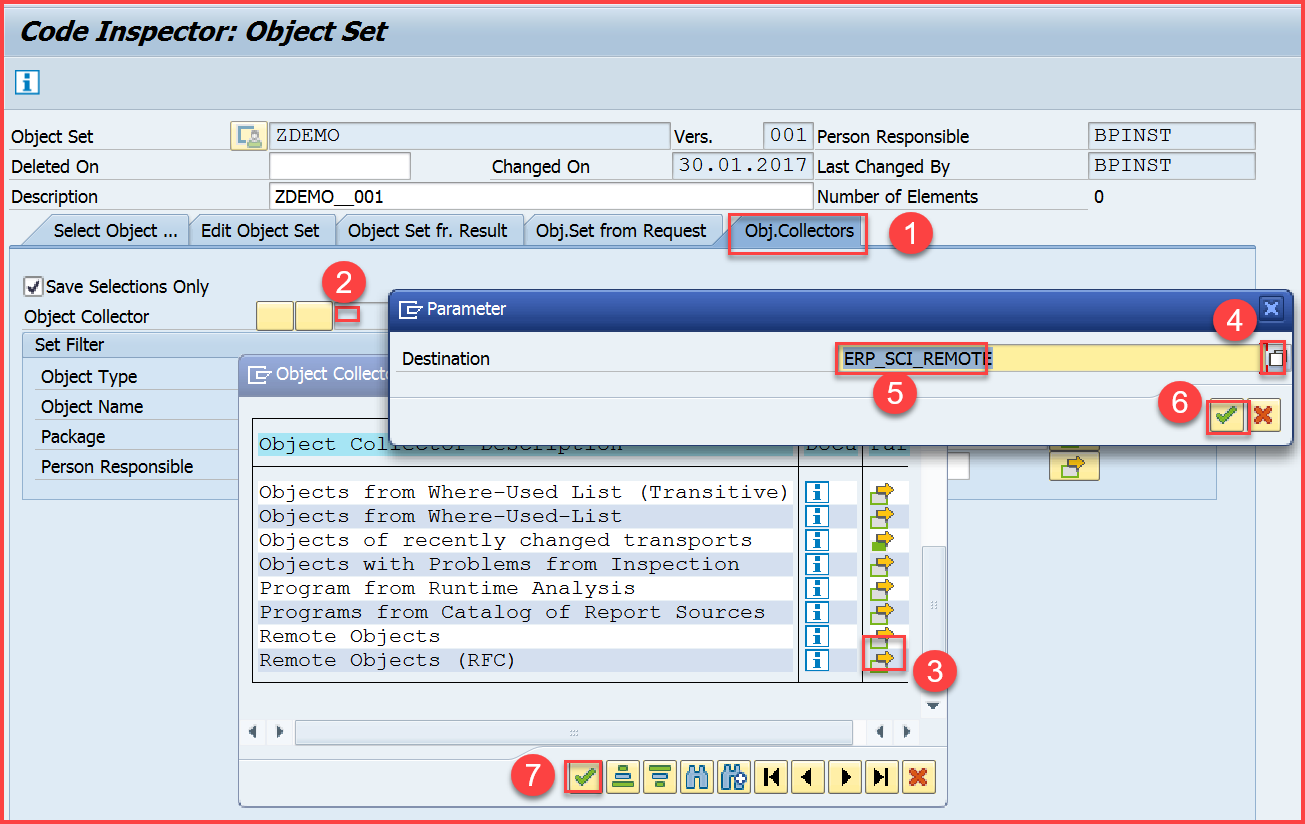
Enter the Package field as below and click on Save
To trigger creation of the object set, save your input. The object set is saved.
Press F3 to go back to SCI initial screen. Select Check Variant as (1) S4HANA_READINESS, enter details as below, enter (2) name of Inspection and click on (3) create.
TIP: In the above screen if you are not able to get S4HANA_READINESS showing up in the F4 popup list then please click on below icon to select Global Variant and then click on F4 popup list as shown below.

Press (1) F4 to select (2) name of the Object Set you created earlier.
Select Check Variant as S4HANA_READINESS
Click on Execute (F8)
It takes some time to generate the report.
REFERENCE MATERIAL:
Please refer to Notes below regarding latest information of Code Inspector Variants:
Note 2272014 Code Inspector Check for Field Length Extensions (aka Material Number Extension check)
Please refer the blog SAP S/4HANA Custom Code Migration Worklist for additional information.
Also this blog for Remote Analysis in ATC for Multiple Systems for additonal information
 Mahesh Sardesai
Product Expert – S/4HANA RIG (Regional Implementation Group)
New NetWeaver Information at SAP.com
Very Helpfull