Purpose of Blog
The purpose of this blog is to provide a technical overview and feasibility of a scenario wherein you are required to send proxy messages from the same SAP ECC system to multiple PI systems in different landscapes.
Requirement
Suppose we have a situation that the ECC system is connected to a PI system. Now, the transaction SPROXY will always show the ESR content of that particular system.
You might encounter a requirement where you want your ECC system to send a proxy message to another system which is in another landscape.
To make things clearer, let me explain you with an example:
At present situation, say your ECC system is connected to a PI system named PILegacy. So, all the ESR content of PILegacy will be shown in SPROXY transaction in ECC system.
Now, we have another PI system named NewPI. The requirement is to send a proxy message from ECC to NewPI.
How do we achieve this requirement?
Problem
The problem over here is that at one time, the SPROXY of a SAP system can be connected to only one ESR. But, we need to trigger particular proxy message of a SAP system to a particular PI system and other proxy messages of the same SAP system to another PI system in another landscape.
Solutions
This requirement can be attained in two ways.
I will explain both the solutions to achieve the requirement.
First Solution
It is important to know that at one time, the SPROXY can be connected to only one ESR.
Note that in my scenario, the NewPI system is Java stack only (AEX).
Please follow the below steps in ECC system:
- Hit the transaction SM59
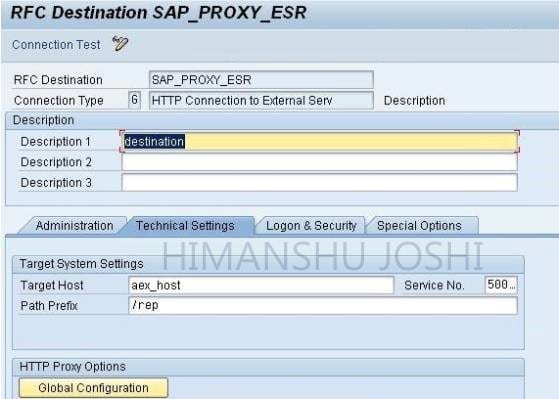
- Create the new RFC destination of type G – SAP_PROXY_ESR
- Put the NewPI AEX server host name and port
- Mention the path prefix as /rep
- User in the logon tab needs to be assigned to role SAP_XI_REP_SERV_USER

Once this RFC destination is created, the SPROXY transaction in ECC system will point to the ESR contents of the NewPI system.
After the ESR content is visible in SPROXY, generate the proxy corresponding to our scenario and activate the same.
Post activating the proxy, please follow the below steps in ECC system:
- Hit the transaction SXMSIF
- Create a Sender/Receiver ID corresponding to the outbound service interface for which we activated the proxy

- Next, go to the transaction SM59 and create an HTTP destination of type G (say AEX_DXB) to NewPI AEX
- Put the AEX server host name and port
- Mention the path prefix as /XISOAPAdapter/MessageServlet?ximessage=true

- Then, hit the transaction SXMB_ADM
- Go to the Integration Engine configuration

- Click on Specific Configuration

- Then go to change mode and click “New Entries”.
- Create one parameter of category RUNTIME
- Give the parameter name IS_URLand Subparameter name as the name of the Sender/Receiver ID created earlier in transaction SXMSIF
- Enter the Current Value as dest://AEX_DXB

- This will ensure that whenever the proxy message corresponding to this particular outbound service interface is triggered, it will always be sent to NewPI system.
Now, the ABAP program will use the method/methods to populate the proxy structure and send the proxy message to NewPI system.
Keynote : Once, the proxy has been activated, the configuration done in ECC can be reverted so that now the ECC system shows the ESR content of PILegacy system in SPROXY transaction. This is because SPROXY always uses connection to a single ESR.
Since this approach of achieving the requirement is not clean (straightforward), so I would suggest to go with the second solution.
Second Solution
This solution involves consuming a web service WSDL with ABAP and SE80.
This is the best solution to our requirement.
Please follow the steps as enlisted below:
Step 1 : Access ABAP Proxy creation wizard via SE80
- Execute the transaction SE80 and click on the “Edit Object”. In the pop-up screen, go to the “Enterprise Services” tab and select the Client Proxy and press Create

Step 2: Create the ABAP Proxy
- You would now be presented with the first screen of the ABAP Proxy generation wizard. Here, we select URL/HTTP Destination and press Continue
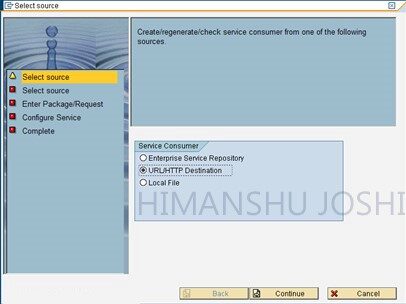
- Now, enter the URL of the WSDL that you obtain from the Integrated Configuration Object (ICO) specific to your scenario in NewPI system and press Continue

- In order to obtain this URL, click on Integrated Configuration and select Display WSDL

- Next, enter the package details or just click the local object checkbox and enter a prefix of “ZES_”. When the auto generation occurs, SAP only has a finite number of characters for the name of the proxy. This prefix helps to ensure that it does not encounter any duplication problems when it trims down names to fit in the field available. Now, press Continue and on the next screen, press Complete
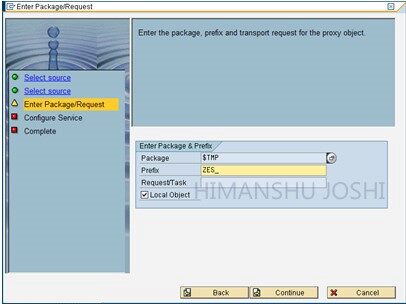
- Your ABAP proxy should now generate and you should be presented with the below screen. Save and activate it

Step 3: Post activating the proxy, please follow the below configuration steps in ECC system
- Hit the transaction SXMSIF
- Create a Sender/Receiver ID corresponding to the outbound service interface for which we activated the proxy

- Next, go to the transaction SM59 and create an HTTP destination of type G (say AEX_DXB) to NewPI AEX
- Put the AEX server host name and port
- Mention the path prefix as /XISOAPAdapter/MessageServlet?ximessage=true

- Then, hit the transaction SXMB_ADM
- Go to the Integration Engine configuration

- Click on Specific Configuration

- Then go to change mode and click “New Entries”
- Create one parameter of category RUNTIME
- Give the parameter name IS_URL and Subparameter name as the name of the Sender/Receiver ID created earlier in transaction SXMSIF
- Enter the Current Value as dest://AEX_DXB

- This will ensure that whenever the proxy message corresponding to this particular outbound service interface is triggered, it will always be sent to NewPI system
Now, the ABAP program will use the method/methods to populate the proxy structure and send the proxy message to NewPI system.
In this way, our requirement to connect with multiple ESRs can be attained.
New NetWeaver Information at SAP.com
Very Helpfull